How To Create A Shared Mailbox
Shared mailbox limit: 50GB
Your shared mailbox can store up to 50GB of data. After that, you need to assign a license to the mailbox to store more data.
When a shared mailbox reaches the storage limit, you'll be able to receive email for a while, but you won't be able to send new email. Then, after that, it will stop receiving email. Senders to the mailbox will get a non-delivery receipt.
What else you need to know about shared mailboxes
- You don't need to assign licenses to shared mailboxes that are under 50GB.
- You need to give users permissions (membership) to use the shared mailbox. Only people inside your organization can use a shared mailbox.
- You can't give people outside your business (such as people with a Gmail account) access to your shared mailbox. If you want to do this, consider creating a group for Outlook instead. To learn more, see Create an Office 365 group in the admin center.
- You can't access a shared mailbox from Outlook for iPhone, Android, or Mac. If you want to access a shared mailbox from one of these devices, use Outlook on the web.
- You can't encrypt email sent from a shared mailbox.
- You can convert user mailboxes to shared mailboxes. See Convert a user mailbox to a shared mailbox.
Fix issues with creating shared mailboxes
Error message: The proxy address "smtp:<shared mailbox name>" is already being used by the proxy addresses or LegacyExchangeDN of "<name>." Please choose another proxy address.
This issue occurs when you're trying to give the shared mailbox a name that's already in use. For example, let's say you want shared mailboxes named info@domain1 and info@domain2. There are two ways you can do this:
Use Windows PowerShell. See this blog post for instructions: Create Shared Mailboxes with Same Alias at Different Domains in Office 365
Or, name the second shared mailbox something different from the start to get around then error. Then in the Exchange Admin Center, rename the shared mailbox to what you want it to be.
How automapping works with shared mailboxes
Automapping is set on the user's mailbox, not the shared mailbox.
This means if you try to use security group to manage who has access to the shared mailbox, automapping won't work. So, if you want automapping, you have to assign permissions explicitly.
How to create a shared mailbox in the Exchange Admin Center
Some customers do all their mailbox management in the Exchange Admin Center. Here are instructions for how to create shared mailboxes using that interface.
To see what permissions you need to perform these steps, see the "User mailboxes" entry in Recipients permissions.
Go to Recipients > Shared > Add .
Fill-in the required fields:
Display name
Email address
To grant Full Access or Send As permissions, click Add, and then select the users you want to grant permissions to. You can use the CTRL key to select multiple users.
NOTE: The Full Access permission allows a user to open the mailbox as well as create and modify items in it. The Send As permission allows anyone other than the mailbox owner to send email from this shared mailbox. Both permissions are required for successful shared mailbox operation.
Click Save to save your changes and create the shared mailbox.
-
Sign in with your Office 365 admin account at https://portal.office.com/adminportal/home.
-
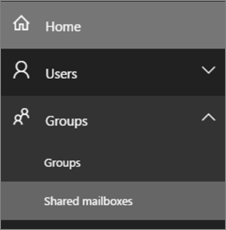
In the Admin center, go toGroups >Shared Mailboxes.
-
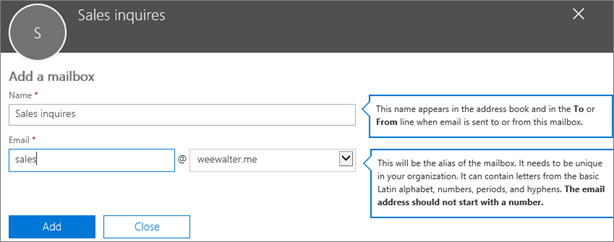
On theAdd a mailbox page, enter a name for the shared mailbox. Then the wizard chooses the email address, but you can edit it.
-
ClickAdd. It may take a few minutes before you can add members.
-
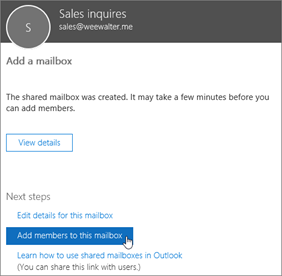
UnderNext steps, chooseAdd members to this mailbox. Members are the people who will be able to view the incoming mail to this shared mailbox, and the outgoing replies.
-
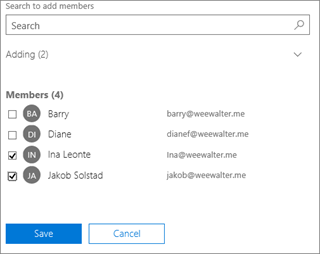
Choose the+Add members button. Put a check mark next to the people who you want to use this shared mailbox, and clickSave.
-
ChooseClose.
You're done! Now go on to the next step: allow everyone to see the Sent email.
Allow everyone to see the Sent email (the replies)
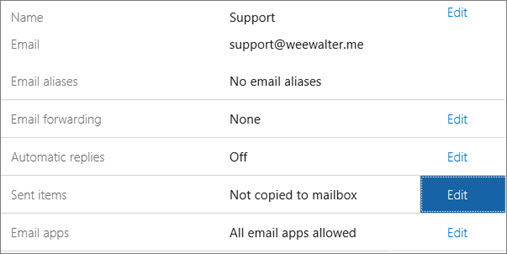
By default, messages sent from the shared mailbox aren't saved to the Sent Items folder of the shared mailbox. Instead, they are saved to the Sent Items folder of the person who sent the message.
If you want to allow everyone to see the Sent email, in the Office 365 admin center, edit the shared mailbox settings, and chooseSent items>Edit.
Add the shared mailbox to Outlook
If you have automapping enabled in your business (by default, most people do), the shared mailbox will appear in your user's Outlook app automatically after they close and restart Outlook.
To learn more, see:
-
Open and use a shared mailbox in Outlook 2016 and Outlook 2013
-
Open and use a shared mailbox in Outlook on the web:Replying as the shared address (such assales@contoso.com)THE FIRST TIME IS VERY TRICKY!Your users will need to do this workaround (this bug isn't going to be fixed):
-
Open Outlook on the web and go to your shared mailbox.
-
Open a message that was sent to the shared address.
-
ClickReply.
-
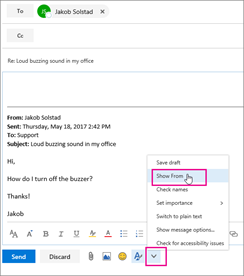
At the bottom of the message, click the More arrow >Show from.
-
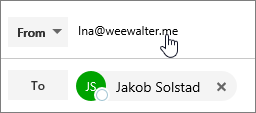
Right-click on the From address - such asIna@weewalter.me - and clickRemove.
-
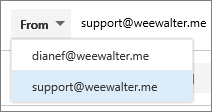
Then type the shared address such as support@contoso.com, and send the message. The next time you reply from the shared mailbox, its address will appear as an option in the From drop down.
-
Use a shared mailbox on a mobile device (phone or tablet)
To access a shared mailbox on a mobile device, open your browser, sign in to Office 365, and then go Outlook on the web. For instructions, see the above bullet forOpen and use a shared mailbox in Oultook on the web. From Outlook on the web you'll be able to access the shared mailbox.
You can't access the shared mailbox from the Outlook app that's installed on the mobile device.
Use the shared calendar
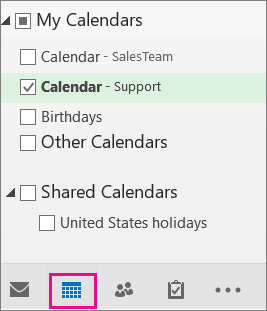
We like the shared mailbox calendar rather than a SharePoint calendar for keeping track of appointments and where people are. A shared calendar is integrated with Outlook, generates reminders, and it's much easier to create and use than a SharePoint calendar.
-
In the Outlook app, go to calendar view, and choose the shared mailbox.
-
When you enter appointments, everyone who is a member of the shared mailbox will be able to see them.
Forward emails that are sent to a shared mailbox
-
In the Office 365 admin center, choose the shared mailbox you want to edit.
-
ChooseEmail forwarding >Edit.
-
Set the toggle toOn and enter a forwarding email address. You can enter only ONE email address. It can be outside your organization, such as a Gmail address, or another shared mailbox.
-
ChooseSave.
Send automatic replies from a shared mailbox
-
In the Office 365 admin center, choose the shared mailbox you want to edit.
-
ChooseAutomatic replies >Edit.
-
Set the toggle toOn, and choose whether to send the reply to people inside your organization or outside your organization. enter your message.
-
Enter the reply you want to send to people inside your organization. You can't add images, only text.
-
If you want toalso send a reply to people outside your organization, choose the check box, who you want to get the reply, and type the text. There's no way to only send to people outside your organization but not to people inside your organization.
-
ChooseSave.
Shared mailbox limit: 50GB
Your shared mailbox can store up to 50GB of data. After that, you need to assign a license to the mailbox to store more data.
When a shared mailbox reaches the storage limit, you'll be able to receive email for a while, but you won't be able to send new email. Then, after that, it will stop receiving email. Senders to the mailbox will get a non-delivery receipt.
What else you need to know about shared mailboxes
-
You don't need to assign licenses to shared mailboxes that are under 50GB.
-
You need to give users permissions (membership) to use the shared mailbox. Only people inside your organization can use a shared mailbox.
-
You can't give people outside your business (such as people with a Gmail account) access to your shared mailbox. If you want to do this, consider creating a group for Outlook instead. To learn more, see Create an Office 365 group in the admin center.
-
You can't access a shared mailbox from Outlook for iPhone, Android, or Mac. If you want to access a shared mailbox from one of these devices, use Outlook on the web.
-
You can't encrypt email sent from a shared mailbox.
-
You can convert user mailboxes to shared mailboxes. See Convert a user mailbox to a shared mailbox.
Fix issues with creating shared mailboxes
-
Error message:The proxy address "smtp:<shared mailbox name>" is already being used by the proxy addresses or LegacyExchangeDN of "<name>." Please choose another proxy address.
This issue occurs when you're trying to give the shared mailbox a name that's already in use. For example, let's say you want shared mailboxes named info@domain1 and info@domain2. There are two ways you can do this:
-
Use Windows PowerShell. See this blog post for instructions: Create Shared Mailboxes with Same Alias at Different Domains in Office 365
-
Or, name the second shared mailbox something different from the start to get around then error. Then in the Exchange Admin Center, rename the shared mailbox to what you want it to be.
-
How automapping works with shared mailboxes
Automapping is set on the user's mailbox, not the shared mailbox.
This means if you try to use security group to manage who has access to the shared mailbox, automapping won't work. So, if you want automapping, you have to assign permissions explicitly.
How to create a shared mailbox in the Exchange Admin Center
Some customers do all their mailbox management in the Exchange Admin Center. Here are instructions for how to create shared mailboxes using that interface.
To see what permissions you need to perform these steps, see the "User mailboxes" entry in Recipients permissions.
-
Go toRecipients >Shared >Add .
-
Fill-in the required fields:
-
Display name
-
Email address
-
-
To grant Full Access or Send As permissions, clickAdd, and then select the users you want to grant permissions to. You can use theCTRL key to select multiple users. Confused about which permission to use? See Which permission should you use?.
NOTE: The Full Access permission allows a user to open the mailbox as well as create and modify items in it. The Send As permission allows anyone other than the mailbox owner to send email from this shared mailbox. Both permissions are required for successful shared mailbox operation.
-
ClickSave to save your changes and create the shared mailbox.
How To Create A Shared Mailbox
Source: https://www.unifeyed.com/portal/knowledgebase/27/How-do-I-add-a-shared-mailbox-on-Office-365.html
Posted by: fletchersetime.blogspot.com

0 Response to "How To Create A Shared Mailbox"
Post a Comment