

How To Create A Drainage Swale
Many farmers and gardeners have heard the term bio-swale, but the exact definition—much less how and why to build one—is elusive for most. To get right to the point, a bio-swale is basically a fancy type of ditch that used for controlling erosion and conserving moisture in the soil. It also creates a rich, moist planting area for perennial crops, like fruit trees, and berries.
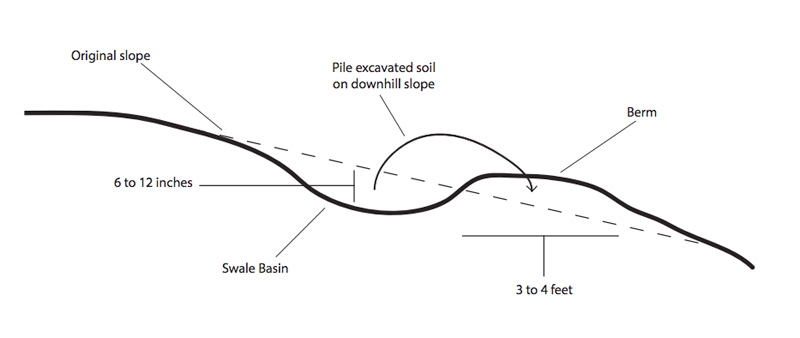
Unlike a typical drainage ditch, a bio-swale is perfectly level, meaning water that flows into it from uphill doesn't flow in one direction or another – instead, a bio-swale fills up like a bathtub during a big rainstorm; afterward, the water slowly seeps into the soil where it is available for crops planted nearby. There are two parts to a bio-swale: the swale, which is an excavated area where water can collect, and the berm, a raised mound on the downhill side of the swale made from the excavated soil. While drainage ditches tend to be skinny with steeps sides, both the swale portion and the berm of a bio-swale are broad and gently sloping, making them quite attractive and useful for planting. Because bio-swales must be perfectly level, they resemble topographic lines , often giving them an attractive undulating shape across a slope (the rice paddies of Indonesia and terraced vineyards of Italy are based on the same concept)
Bio-swales arrest the process of erosion by slowing water down when it pours across a slope. Any soil that has been carried off from uphill is deposited in the bottom of the bio-swale and moisture is concentrated around it, making for a lush, fertile planting location. Besides reducing erosion, recharging groundwater and building soil, bio-swales can also be part of your manure management strategy. One of the best places to build a bio-swale is at the bottom of a pasture or a chicken run where they will soak up manure-laden runoff and concentrate it in a location where you can plant a crop to make use of the nutrients – rather than letting the nutrients wash downslope into the nearest waterway, where they would become a pollutant.
Fruit trees, berry bushes, and other perennial crops are the best choices for planting around a bio-swale; they are not a landform that can easily be tilled and planted with annual crops. Some growers build a bio-swales every 10 or 20 feet down a slope and use them as planting strips for an orchard or vineyard. On small properties, a single bio-swale at the bottom of the garden makes a convenient place to plant a border of fruit trees and perennial herbs and flowers, while soaking up runoff before it flows off the homestead.
Step-By-Step Instructions
Fall is a sensible time of year to build a bio-swale, because the weather is cool and the soil is usually soft and moist. A lot of digging is required, so you may want to organize a bio-swale party to lighten the labor.
Step One: Mark It
Ditches are designed to carry water away, which means they are sloped downhill. Swales, however, follow the contour of a hill, so the water that drains into them doesn't flow one way or another, but fills the swale when it rains. This means the bottom of a swale needs to be level (i.e. have the same elevation from one side of the swale to the other). So, the first step is to mark the ends of the swale across the slope.
- Place a 4-foot carpenter's level on the ground at one end of the area where you want the swale to be located, and adjust it until it reads level (meaning you've found ground that's perfectly level horizontally). Pound a wooden stake into the ground at both ends of the level to mark the location.
- Slide the level laterally across the slope in the direction where you want the swale to go, and put one end against the stake that was just pounded in. Adjust the other end of the level until the it reads level. Pound in another stake.
- Repeat this process across the slope until you've reached the end of where you want the swale.
Hint: Remove any debris that is on the ground under the level to get an accurate reading.
Step Two: Dig It
The line of stakes shows you where to start digging.
- Excavate a broad shallow basin in the area immediately below the line of stakes and pile the soil on the downhill side of the basin to form a broad, gently sloping berm. There are no hard rules about the size of a swale, but the bigger it is the more water it can absorb during a rainstorm. Six- to 12-inches deep and 3- to 4-feet wide are typical dimensions.
- Smooth out the shape of the berm with a hard metal rake to form a planting bed. The slope of neither the berm nor the swale basin should exceed a 1:3 ratio to ensure the stability of the bio-swale. (In other words, don't let the slope drop more than 4 inches for every 12 inches of length).
- Remove the stakes.
Hint: Stand on the uphill side when you're digging to make it easier.
Step Three: Plant It
The bottom of the swale basin is only suitable for plants that thrive on high moisture levels, such as wetland species like reed and sedges. However, clover, most grasses, comfrey, and numerous other plants will tolerate the occasional inundation that occurs at the bottom of a swale.
The berm is the best place to plant fruit trees, berry bushes, vine, herbs, flowers, and anything else that likes loose, rich soil, but requires excellent drainage. Over time the swale basin will fill in with loose soil and organic matter, creating a rich reserve of nutrients for the roots of the plants to tap into.
Sign up for your Modern Farmer Weekly Newsletter
How To Create A Drainage Swale
Source: https://modernfarmer.com/2015/11/how-to-build-bio-swale/
Posted by: fletchersetime.blogspot.com
0 Response to "How To Create A Drainage Swale"
Post a Comment